
Best Method to Stain a Fence: Easy Step-by-Step Guide
Is your wooden fence looking tired, gray, and weathered? A beautiful fence can make your whole yard look amazing, but only if it's well-maintained! Finding the best method to stain a fence doesn't have to be complicated or overwhelming.
Many homeowners struggle with streaky results, missed spots, or stain that peels off after just one season. We understand your frustration and want to help! In this guide, we'll show you exactly how to transform your fence with professional-looking results, even if you've never done any fence staining before.
With the right tools, techniques, and a little patience, you'll have a gorgeous fence that will be the envy of your neighborhood.
Why Staining Your Fence Matters
Before diving into the how-to, let's talk about why it's important:
Protects wood from rot, mold, and insects
Prevents warping and cracking from sun and moisture
Extends the life of your fence by 3-5 years per application
Enhances the beauty of your outdoor space
According to This Old House, a well-maintained fence can last 20+ years, while an unstained fence might need replacement after just 5-7 years.
What You'll Need
Gather these supplies before you start:
Tools:
Garden sprayer or pump sprayer
Paint brushes (4-inch and 2-inch)
Paint roller with extension pole
Stain pads or specialty fence staining tools
Garden hose with spray nozzle
Pressure washer (optional)
Drop cloths or plastic sheeting
Work gloves
Safety glasses
Painter's tape
Materials:
Exterior wood stain (oil-based or water-based)
Wood cleaner/brightener
Sandpaper (80-100 grit)
Plastic bucket
Stirring stick
Best Time for Fence Staining
Timing matters when looking for the best method to stain a fence:
Choose 2-3 days of dry, mild weather (50-85°F)
Avoid direct sunlight on the fence while staining
Spring or fall are typically ideal seasons
Check weather forecast for no rain within 48 hours
According to Consumer Reports, staining during extremely hot days can cause the stain to dry too quickly, leading to lap marks and uneven coverage.
Preparation: The Key to Success
Good prep work is crucial for a professional-looking finish:
Clear the area around your fence. Move plants, furniture, and decorations at least 2 feet away.
Cover nearby plants with drop cloths to protect from stain splatters.
Inspect the fence for damaged boards, loose nails, or protruding screws. Make necessary repairs.
Clean the fence thoroughly. Apply a wood cleaner following product instructions.
Rinse completely with a garden hose or pressure washer on a low setting.
Allow the fence to dry completely (usually 24-48 hours).
Sand rough areas lightly with 80-100 grit sandpaper.
Brush off all dust from the fence surface.
According to Behr Paint, proper cleaning can remove up to 80% of previous finish failures, setting you up for successful staining.
Choosing the Right Stain
The type of stain matters for long-lasting results:
Transparent stains enhance wood grain but offer less protection
Semi-transparent stains show some wood grain with medium protection
Solid stains hide grain completely but provide maximum protection
For most fences, semi-transparent stains offer the best balance of beauty and durability.
Sherwin-Williams recommends oil-based stains for cedar and redwood fences, while water-based stains work well on pressure-treated pine.
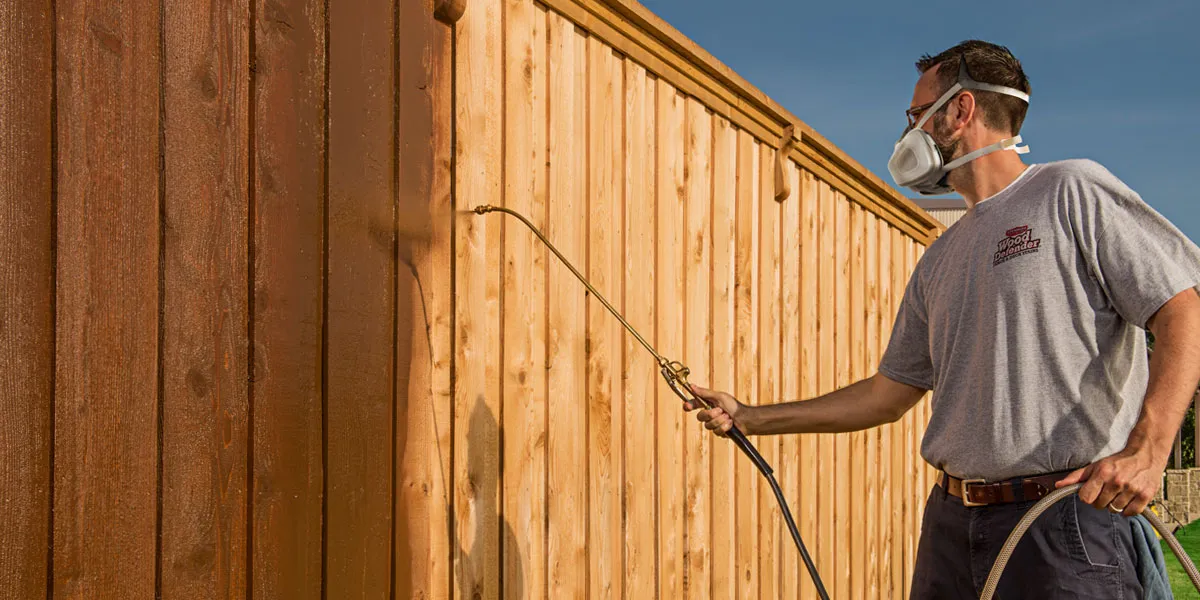
Roller, Brush, or Sprayer: Which Is Best?
One common question we hear is: "Is it better to spray or roll stain on a fence?" Let's compare the options:
Sprayer:
Pros: Fastest method, gets into cracks easily
Cons: More wasteful, requires careful masking, wind can cause overspray
Roller:
Pros: Good coverage, moderate speed, less waste than spraying
Cons: May not get into all cracks and grooves
Brush:
Pros: Best penetration into wood, most control
Cons: Slowest method, can be tiring for large fences
For a standard 150-foot fence (6 feet tall):
The Cost-Benefit Analysis: Is Staining a Fence Worth It?
According to Family Handyman, the best results come from a combination approach. Many professionals recommend using a sprayer for initial application, followed immediately by a roller or brush to work the stain into the wood.
If you're wondering about roller or brush to stain fence, consider that brushes give the best penetration but rollers can speed up the process on flat surfaces.
The Best Method to Stain a Fence: Step by Step
Now for the main event - let's stain your fence properly:
1. Test Your Stain
Stir the stain thoroughly with a paint stick. Never shake the can as this creates bubbles.
Test the stain on an inconspicuous area of the fence to confirm color and absorption.
2. Apply the First Coat
Start at the top of the fence and work your way down.
Choose your application method:
For fastest results: Use a pump sprayer for large areas
For moderate speed: Use a roller with an extension pole
For best control: Use a quality paintbrush
When using a sprayer, keep it 8-12 inches from the surface and apply evenly.
Follow immediately with a brush or roller to work the stain into the wood grain and catch any drips.
Stain 2-3 boards at a time from top to bottom before moving to the next section.
Use brushes for detail work around edges, corners, and hard-to-reach areas.
According to This Old House, when choosing whether to stain fence with roller or sprayer, the combination approach generally gives the best results.
3. Watch for Issues
Look for "shiny" spots where stain isn't absorbing. Wipe these areas with a rag.
Check for drips or runs and smooth them out immediately.
Maintain a "wet edge" by not letting the previous section dry before connecting to the next section.
4. Apply a Second Coat (If Needed)
Allow the first coat to dry according to manufacturer's instructions (usually 4-24 hours).
Determine if a second coat is needed - look for uneven areas or light spots.
Apply a second thin coat using the same technique as the first.
According to Olympic Stain, two thin coats often provide better protection than one heavy coat and reduce the chance of peeling.
Cleanup and Maintenance
Clean all tools promptly with appropriate solvent (mineral spirits for oil-based stains, soap and water for water-based).
Dispose of used materials properly according to local regulations.
Store any leftover stain in a sealed container for touch-ups.
Tips for Long-Lasting Results
Reapply stain every 2-3 years for maximum protection.
Inspect your fence annually for signs of wear.
Clean your fence with a garden hose and soft brush once a year.
Trim plants away from direct contact with the fence.
Remove mold or mildew immediately with a mild bleach solution (1 part bleach to 10 parts water).
According to Benjamin Moore, proper annual maintenance can double the life of your stain job.
Conclusion
Following this best method to stain a fence will give you professional results that protect your investment and beautify your yard for years to come.
Remember that the key to success lies in proper preparation, quality materials, and careful application techniques. While fence staining takes some time and effort, the satisfaction of seeing your transformed fence and knowing you've added years to its life makes it all worthwhile.
By using this best method to stain a fence, you'll save money on replacements and enjoy your outdoor space even more!
4. Maintenance Free Fencing

© 2025 | All Rights Reserved | Privacy Policy